EW Second Round 2016 Game Report
Today’s game was my second
round game of the Essex Warriors Annual DBM Tournament.
I had elected to use Low
Countries because it was a new army, I had not used it in anger before this
year and I wanted something totally out of my comfort zone to test my skills
and ability.
After my first round
victory I was drawn against Tim Myall’s Western Chou.
Our armies are unchanged
from the first round games as the tournament follows the usual BHGS format of
four rounds but fought over the course of the year rather than over a weekend.
This allows players to make full use of the all day Sunday we have to play and
means they get to play in a tournament which otherwise most of them would not
have the chance to.
Tim’s army consisted of
three commands organised thus:
C1 = 23 E/21.5 EE/7.5 D
[25% = 5.5 EE] CinC
C2 = 29 E/28 EE/9.5 D [25%
= 7 EE] Sub general
C3 = 16 E/15/5 EE/5.5 D
[25% = 4 EE] Sub general
Army 68 E/65 EE/32.5 B
The Low Countries have an
Aggression of 0 compared to the Western Chou Ag 3 with both armies being in a
Cold Climate. We bother elected to invade in the Summer.
I rolled Ag 0 + 6 = 6
which made me think I was going to be the invader. Tim then rolled Ag 3 + 4 = 7
meaning it was 13.00 hours and with no weather and I was the defender. Because
of the way DBM terrain works based on available options on the defenders army
list Tim decided not to place any terrain and waited to see what I would do.
Being a mainly infantry army I was serious worried about ending up being
outflanked on both sides so rolled for a Waterway, successfully and took the
mandatory BUA and a 1.5 FE of Rocky RGo.
I placed the WW on my left
flank and pushed the BUA out into it as if it was a Quayside. The large RGo
area fell into opposite central zone and nicely split the table into two
halves. Tim then chose three 0.5 FE of Rocky RGo and diced for their placement.
Two fell into my half of the table and the third along Tim’s base line. Due to
the tables being over deep we used a boundary road to show where the table
finished on Tim’s side.
As the defender I had to
place my Baggage elements and Field Fortifications [TF] which gives Tim some
clue as to my deployment. Tim then placed his baggage along his rear edge.
 |
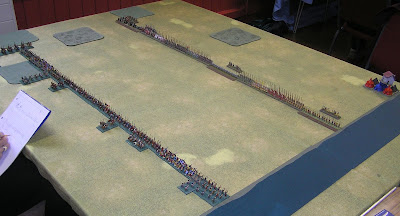
| Table with baggage and TF laid out |
We then wrote out our
command deployments. I deployed my CinC’s command across my front to take
advantage or its ability to cover from the waterway to the RGo. I then deployed
the other two commands adjacent to each other slight to the rear in the centre
of my battle line. Tim deployed his smallest command opposite my centre with his
CinC’s command to his far left and much to my surprise elected to flank march
his largest command,
Here are the armies as
deployed before we started the first move.
Tim rolled to proceed and
his flank march didn’t arrive – thankfully.
I pushed forward as fast
as possible with the aim of taking out his isolated command whilst holding my
right flank.
After I had reach about half way across the table Tim’s flank
march diced to arrive meaning I had to reconfigure my plans. I used my highest
dice to turn my 3rd command to protect my open flank and pushed the
Planconmen forward to take on his light infantry holding the end of the RGo.
It
was at this time my Guildsmen knights started to reach bow range and Reg Kn I
are not a good idea opposite bowmen even if they are Irr Bw I.
After losing one knight to bowfire I rearranged the command whilst I dismounted my CinC as a Reg Bd S Kn and threw in my other two knights to try and take out his commands Chariot Reg Kn O general. The first round combat failed and I recoiled drawing his general back into contact with me.
I was also facing being surrounded on
the right flank as Tim pushed in his column of auxilia behind my CinC’s Planconmen It was at this time I double overlapped his smallest commands
general and destroyed it. In Tim;s next bound he rolled a 4, 2 & 2 for this
PIP’s meaning he was forced to allocate the 4 to his now general less command to
stop it breaking. Is game me a small window of life as he moved to break my
CinC’s command heavily hampered by the lack of PIP’s.
The next bound he flanked
my isolated knights and Planconmen and their losses broke my CinC’s command
which started to flee to the rear.
Having looked at the casualty count I
realised that I needed to break his smallest command as quickly as possible and
charged forward with my 2nd command and used my four Reg Bw O to
take out his end Irr Bw I over the next three turns of shooting to break his
command. It was now all to play for and if I managed to get into his baggage I
could get enough casualties to be very near to breaking his army. Tim cleverly
delayed my command meaning it took me too long to get close enough to take out all of his baggage.
Over on my far right my
pikemen were now turned 90 degrees and facing his wall of chariots. I pushed
forward to ensure I was able to contact them on my next turn when Tim threw in
his chariots. I killed one chariot and recoiled the rest. I then threw in my Planconmen two deep and my pikemen and took out another two chariots. Tim then
came back in and took out four pikemen by hard flanking the rear two ranks preventing
the whole end block from recoiling. His chariots were still dying in droves and
I was half an element from breaking his CinC’s command for at least three
turns of combat. I realised that I had to play to win and threw in my remaining
troops to try and snatch victory. It failed and only delayed my defeat for one
bound of combat. Tim the returned the favour and took the last two casualties
to break my second command and with it the whole army and win the game.
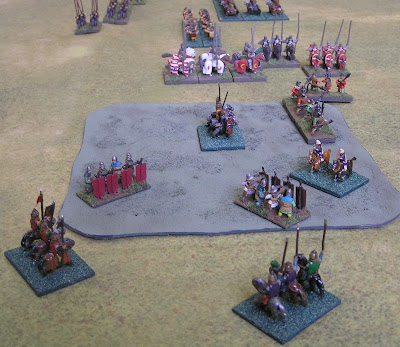
Below are the last pictures of the game taken as it developed.
It was a hard fought game
and could have ended up as a 7 - 3 victory instead of the 9 - 1 defeat. We are
using the BHGS scoring system which meant Tim won 27 – 5.
I was surprised that Tim elected to use his largest command to flank march with as I have a history of them arriving too late to influence the battle. Had it not arrived when it did I feel that I would have had sufficient time to break his smallest command and take out all of his baggage. This would have left me with only needing to take out five other elements from the rest of the army to gain victory.
I learnt a lot more about how to use this army and I am looking forward to fighting Paul Brady and his
Feudal English army in the third round.


