2016 Painting Project Later Hungarians
Since money is a bit tight and I have not sold much on EBay in the last few weeks I had a look in my Project Lead Mountain pile and compared this to my current collection and realised that with minimal purchasing I could morph my Medievals into another new army, namely the Later Hungarians based on the DBM and DBMM army lists in 15mm scale.Because Museum Miniatures does a 25% off sale during January I decided this was the best time to buy at least some of the metal I was missing to start the project at reduced expense. So off went the order on Dave Hoyles to the value of £40-37 to buy 6 x WW03a Warwagons, 16 x MD52P Handgunners, 16 x MD53P Handgunners, 24 x MA19 Pavise plus 24 more farm animals, [goats, pigs and sheep] to be used in some baggage elements for another project.
I also sent an order to Essex Miniatures for 7 packs of cavalry to use as part of the LH for the project, 3 x EMED20 Polish 1350-1480: Serbian Hussar with Lance & Shield, 2 x RNN4 Tartar: Horse Archers Firing to Side and 2 x RNN3 Tartar: Horse Archers firing forward costing another £27-52.
Finally I needed to source some figures for the Szeklers and after looking at various ranges decided that the Donningtons Rumanians range would be ideal and I ordered 1 x MOLOC01 [General], 1 x MOLOC05 Boyar [as standard], 20 x MOLOC04 Boyar and 20 x MOLOC06 Boyar costing £30-20.
Anyone who says wargaming is a cheap hobby is having a laugh as I spent just under £100 just for the missing mounted troops. Luckily I have lots of suitable infantry castings left in Project Lead Mountain to enable me to build dedicated infantry elements for this army at no additional cost even though I could just use some other painted elements for the infantry if I wanted.
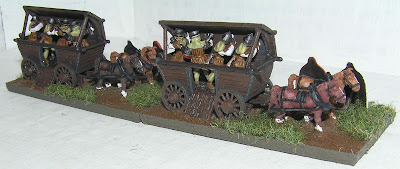
I started the project as soon as the castings arrived which means some cleaning up of the castings and of course assembly of the warwagons before I even put paint to metal. The warwagons were fairly straightforward to put together with minimal cleaning up required but careful use of the professional standard boat builders superglue was required to ensure the wagon roofs were a good fit and this took me a couple of days as I left the glue to set before applying additional glue to the joints as added insurance against their failing in the near future.
The handgunners were a tight fit inside the assembled wagons and I quickly decide that their bases needed a lot of trimming so only the metal around their boots was left and that the toes would have to be cut off so they actually fitted inside the base of the wagons properly. There are four firing positions inside each wagon and I worked out that I could just fit four castings inside with a bit of effort.
I painted the handgunners first and when they were done I also varnished them before starting on the warwagons. Below is a picture of the completed handgunners
Now onto the warwagons. I painted them a dark overall brown with a light dry brushing of light brown for the grain effect then gave them an overall wash of Sepia to give it some shading depth. The metal work was paints using an old pot of Humbrol Coal Colour and then washed with a much watered down coat of chainmail colour to give them a nice metallic finish along. I painted the limber horses using my standard three colour technique and gave them all black leather harness and tack with a dark grey highlight.
The pavises were a bit more of a problem as using heraldry for the Hungarians isn't correct unless its for named personalities so I did a bit of research and found some popular motifs that were commonly used in Hungarian armies to represent either religious or national symbols.
After spending a day putting the crews inside the wagons, letting the superglue dry properly I retouched any damaged painting and set about hot gluing the wagons, horses and pavises to the bases. I then apply texture paste to the bases using ladies waxing wands trimmed down so I can get between small areas. I used precut MDF basing and I also use 2mm thick magnetic sheeting that is trimmed to cover the entire underside of the bases which gives them a secure fit when travelling and makes them easier to pick up without having to touch the castings too much. I pre-mix my base colour to what I use as my standard European colour. Paint the edges with an Earth Brown contrasting colour to set off the basing. Finally I use watered down PVA glue to apply patches of static grass. Once this is properly dried I spray the entire elements with Matt Acrylic Sealer Varnish to protect the paint and also help fix the static grass to the bases.
Below are a series of pictures I have just taken showing the six finished warwagons.
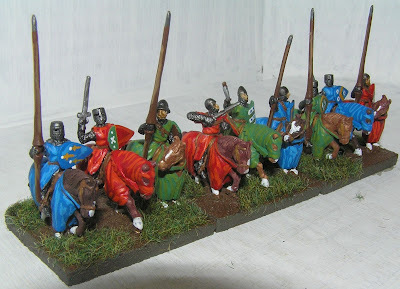
Finally the last three Feudal knights I hope I ever need to paint for my own collection. All Essex Miniatures.


Drew, the wagons are wonderful! Well done, really.
ReplyDeleteThis is a very late Hungarian army, right?
Have you done any research into dyes available at various times in history to various societies?
IMHO the blues and reds peole use are way too bright, though you do get a good effect in the scale, which is the convention. I just think that darker pigments make the troops look more warlike than tournamenty.
Cheers
Greg
I paint for effect on the tabletop at 15mm scale hence the result I produce. I have seen far too many historic looking figures that end up as dark looking blobs from 1m away.
Delete